Failure Analysis
Our Laboratories are able to perform the most modern analytical techniques for materials analysis composite, metal, polymeric.
SCANNING ELECTRON MICROSCOPE (SEM)
Morphological analysis of fractures, treatments and surface coatings, analysis of historical artifacts, are executable by Scanning Electron Microscope Zeiss Evo MA15 with high resolution LaB6 source. The X-ray Microanalysis allows to perform quantitative spot analysis of the yacht.
METALLOGRAPHY
We are able to perform micrographs, macrographs, micro hardness, analysis of inclusions, grain size, structure verification of any metallic material, according to the applicable reference standards.
We are able to perform breakdowns and failures analysis, in order to provide input to the activities of Problem Solving.

TOMOGRAPHY
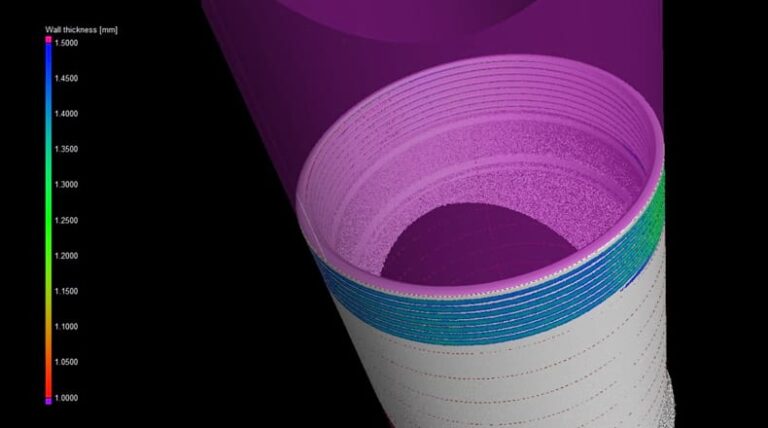
This new technology allows to have an accurate 3D reconstruction of the geometry of the analyzed object (internal and external) and of its functional characteristics thus, making the immediate identification of any possible failure of the yacht’s systems.

ENVIRONMENTAL TEST BENCHES
- Thermal shock
- Climatic chambers
- Corrosion tests in artificial atmosphere
- Ageing (sunlight, ozone)

FUNCTIONAL AND MECHANICAL TESTING
- Functional testing
- Static testing
- Fatigue testing (HCF-LCF)
- Vibration testing
- Impact testing
- Custom testing
TESTING RELIABILITY
In collaboration with our laboratories network we are able to perform mechanical and functional tests in order to verify the mechanical characteristic of components onboard.
MECHANICAL TEST BENCHES
- Static load up to 250 KN
- Fatigue test up to 250 KN and 40 Hz
- Pressure pulsation
- Impact
- Vibrations
NON DESTRUCTIVE TESTS
Researching Defects
- Contrast Penetrant Liquid
- Fluorescent Penetrant Liquid
- Magnetic Particles
We are able to examine castings, forged and machined parts in different materials (steel, aluminum and magnesium alloys, brass and bronze, titanium, plastics and composites) in order to detect signs of possible defects that might affect the use of the product.
DYE LIQUID PENETRANT
The liquid penetrant inspection is a control system suitable
for non-ferromagnetic materials. The inspection allows to make evident with high sensitivity and accuracy each discontinuity surface, although very small, such as cracks, porosity, laps.
In the method with contrast penetrant, a visible liquid (usually red) is made to penetrate the discontinuity surface of the workpiece. After removal of excess fluid and the application of a detector (usually a silica based amorphous liquid absorbent) is highlighted each discontinuity due to the color contrast of liquid detector.

FLUORESCENT LIQUID PENETRANT
This method uses a fluorescent liquid penetrant (with different sensitivities depending on the type of detail and material examined), visible after the application of the detector after illumination with black light (Wood lamp).
Pontlab, our Partner world leader in this field, is equipped with an inspection facility with the ability to run checks with post-emulsifiable fluorescent penetrants according to the main mechanical and aerospace standards (EN 571, ASTM E 1417, AMS 2644, MIL , ASME, DIN, UNI, BS, AFNOR).
MAGNETIC PARTICLES
Magnetoscopic inspection (MT) exploits ferromagnetism of some metals to highlight the anomalies of the flow lines of the magnetic field of a near surface defects. The flow lines, which represent the strength of the local magnetic field near a discontinuity, as for example a micro-cracks, a cavity or an inclusion, are gathering or dispersing, turning locally and creating an anomaly in the magnetic field the edges of the defect. Just spray the surfaces or wet them with suitable suspensions of ferromagnetic powders, colored or fluorescent, for aligning the particles along the flow lines of the magnetic field.
The different colors of powder or fluorescent light emitted in the visible spectrum when they are irradiated with ultraviolet light (Wood’s light), will highlight each of their concentration and consequently, the outcrop or subcortical defects.
The Magnetoscopy allows to highlight surface and subcortical defects not detectable with liquid penetrant, provided that the disturbance of the magnetic field in their vicinity can come to the surface to be examined.
ANALYZE YOUR YACHT SYSTEM TODAY
Contact us for more information!
